0. Basics
First of all, what problem is it actually about? Not so easily explained, but widely noticed:
- Send the DOI- email asking to confirm the opt-in (and address) as part of a regular Mautic campaign - it may take several minutes for the mail to be sent, which is not only inconvenient, but definitely increases the abandonment rate.
- On the other hand, sending the same email directly from the Mautic form via form action, which serves as the starting point of the campaign, the short delay may mean that the click on the confirmation link is not recognized when the campaign checks for the Decision "Visits a Page". Because, beware: "Decisions" do not check for activities that have already taken place, but only wait for future ones!"
So, we need to find another way to check the confirmation click (more precisely: the visit to a DOI-Landingpage.
Two methods suitable for this purpose are presented here:
Mautic Double Opt-In plugin and a vanilla Mautic solution.
Double-Opt In Plugin
First, we present a "Double Opt-In Plugin" which allows us to easily implement a DOI process. The plugin including installation instructions is available for free on Github: github.com/content-optimizer-gmbh/mautic-doi-plugin
The plugin works with Mautic 4.4.3. at the time of writing.
1. Create your lead form as a “standalone form”
...and send the DOI mail via new form action "Send Double Opt-In Mail to contact".

2. Configure the double opt-in form action
The form action includes a variation of configurable features, however, basic to functionality only two fields need to be filled in.
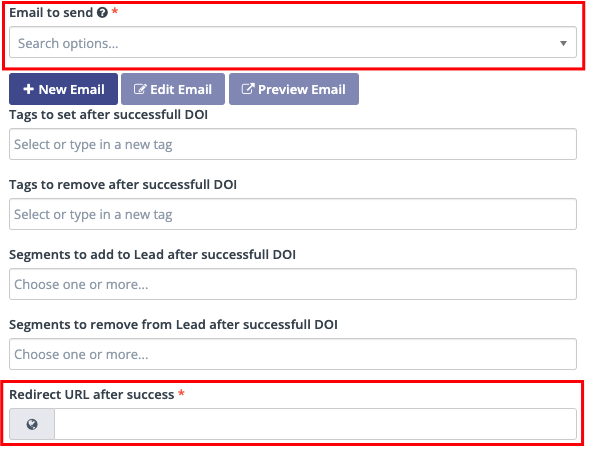
On the one hand, the DOI mail that is to be sent to the contact after filling out the form, and on the other hand, the landing page to which the contact is forwarded to after confirming his email address.
Additionally, the successful double opt-ins can be documented simply by using tags or segments.
3. Place the token in the DOI email
The specific token "{doi_url}' must be placed in the DOI e-mail. This token will later become the URL that was specified in the form action.
4.Done
As a result, all successful Opt-Ins are now in one segment (or have a tag). You could now start sending emails to these contacts.
Vanilla Mautic solution (without plugins)
In case the above mentioned plugin is not compatible or should not be used, we have the following vanilla Mautic option for you.
1. Components for the Double Opt-In Process
For the double opt-in process we need the following components:
- Form
- Campaign
- Landing page
- DOI-Success Segment
- DOI Mail
- A cronjob
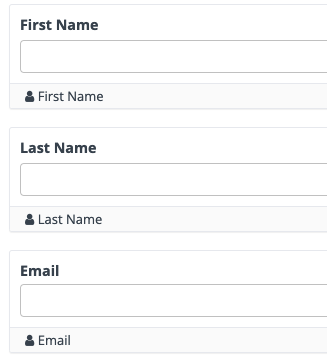
2. Create your lead form as a "Campaign Form”
The form can be kept very simple. We only use the first name, last name and email of the contact. No form action is needed.
3. Create your double opt-in email
The email is also kept lean. What is relevant is that the email contains a link to the DOI landing page, because we evaluate this link click within the campaign. It is the indicator for a successfully completed double opt-in process.
4. The Double Opt-In Campaign
And with that, all the components exist to breathe life into the campaign.
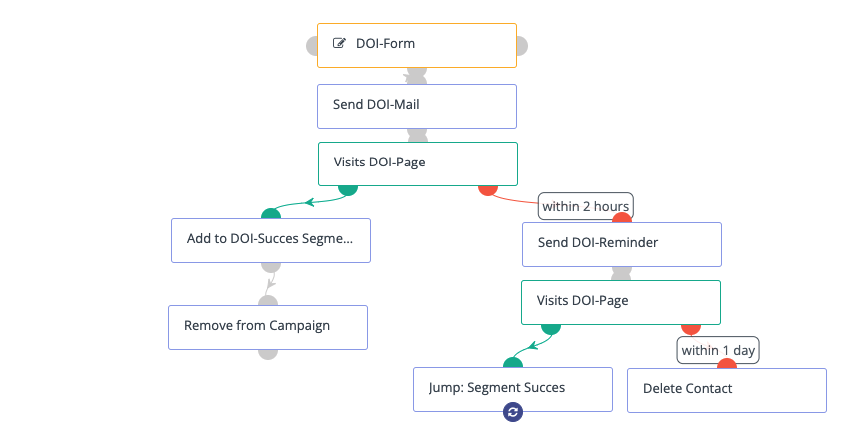
The campaign process consists of the following steps:
- The starting point is the lead form
- The double opt-in mail is sent
- Checking whether the DOI landing page has been visited
If Yes:
4a. Contact is added DOI-Success segment
5a. Contact is removed from the campaign.
If not:
4b. DOI reminder mail is sent after two hours
5b. Checking whether the DOI landing page has been visited.
6b. If yes, contact jumps to step 4a.
7b. If no, the contact is deleted after 24h.
5. The Cronjob
Now it gets a bit more technical again. Since the double opt-in mail is sent from the campaign, the campaign must be triggered as quickly as possible. The standard 15-30 minutes trigger time of campaigns is of course much too long for this.
Therefore, we control the campaign ID directly via cronjob, so that it is triggered once per minute.
In the following command you have to replace the path to your Mautic and the ID of the double opt-in campaign. The campaign will be triggered once per minute.
*/1* * * * /path/to/mautic/bin/console mautic:campaigns:trigger -i ID
6. Last Settings
Last but not least, "Identify visitor by tracking url" must be enabled in the configuration, more precisely in the tracking settings.

This allows the link click to be attributed from the DOI email, even if cookies are disabled, as the link is routed through Mautic.
7. Done
And that was it. Again, we have a reusable segment as a result (alternatively, tags would of course also be possible here).